So much great gardening information to be found around the web. Kind of makes me wonder how we gardened or did anything else for that matter before the Internet! Here's some garden links I found interesting this week:
You Grow Girl: Make Your Own Pop Bottle Irrigation System
This is a post from 2001 but it seems more relevant today than ever. This combines two things I love: drip irrigation (I'm lazy, there's nothing more to it than that) and recycling. I have looked at commercial variations of this same thing. Of the commercial products I have looked at (and not purchased, I might add), one was simply a set of spikes to attach to recycled 2 liter bottles. The other was a more "scientific" and "highly engineered" system that included both the spike and bottle in addition to a special disc that was supposed to guarantee proper watering. Whatever. It didn't work. Sometimes things can be just too thought out. I like the idea of using things I already have and re-purposing them for something else. I think this could also work with smaller pop bottles for house plants as well.
No Dig Vegetable Gardens
This site caught my eye precisely because I'm a lazy gardener. However, I'm also a marketing major and prone to skepticism when I see claims like this. Turns out this is just a really clever way to talk about raised bed gardens, which for many of us is an excellent idea. This site is not selling anything other than the idea of raised bed gardening and has wonderful information about vertical gardening, children's gardening and other general gardening information. Is a raised bed garden a no dig garden? Technically, but they are still work initially so the idea that this is less work will depend on interpretation. However, there is a wealth invaluable gardening information regardless if you use raise beds or not.
Overwintering Geraniums
Ok, yes, this is my own article so I didn't have to search very hard for it. I included it for it's seasonal timeliness. This article was written based on my own personal experience with overwintering geraniums. I don't have a sunny window in which to overwinter geraniums in pots and I don't have a cellar that is cool and dark. What I do have is a finished basement that is heated because my children's bedrooms are down there and, of course, the big TV. I had read about how you're supposed to overwinter geraniums by hanging them upside down in paper bags in a cool dark place. Since I don't have those requirements (not even a paper bag!), I decided to see what would happen if I put the plants in a cardboard box in the laundry room next to the dryer since it was the only out of the way space I had. What happened was that out of 15 plants, 11 survived. Talk about drastically cutting down on the spring flower bill! Of the 4 that did not survive, 3 were ivy geraniums. I will do the same this year to see if I get the same results from the ivies.
Showing posts with label tips. Show all posts
Showing posts with label tips. Show all posts
Monday, October 4, 2010
Friday, May 28, 2010
It Pays to Pinch
The most common advice I give to fellow gardeners is to pinch plants back at planting time. And by pinching back, I really mean get rid of the flowers which is the whole reason they bought the plant in the first place. Most people react as if I've told them to remove the heads of their children. But unless you want a straggly, unflower-y mess come late July, pinching off those flowers in May is a must.
The conundrum of plant buying is if the plant isn't blooming chances are you will overlook it. Buying plants can be such a visceral, emotional thing. A blooming plant is more likely to entice you to buy. However, this is not really the plant you want to plant. The best plant is short and wide, no flowers and preferably few buds. Sounds depressing, right? Basically, you want plants that have put their energy into roots and not flowers early in the season. Then when you plant them, they are well established and will bloom more than if you buy the flowering plant.
However, in order to get you to buy the plant, retailers will try to make sure that plant is blooming when you come to buy. Makes sense, right? That's where the pinching comes it. You can basically force a plant to put down roots at transplant time rather than continue spending it's energy putting out those lovely flowers that made you buy it in the first place.
 Case in point, I got these Red Morn petunias at work. Now our early warm weather in April made many of our plants go a little crazy, consequently, these are pretty leggy petunias. If I were to leave these as they are and plant them, the result would be disappointing. The plant would never fill out the pot I'm planting them in and the blooms will be sparse on spindly, scraggly stems. So not the look I'm going for.
By pinching off the long stems and yes, all the blooms, the plant will put it's energy into putting down a strong root system and sending out more stems on which to grow even more blooms. It's hard. I'm not even going to pretend that it isn't. It's taken me years to get on board this train and it still pains me to do it. The only way I can is that I know I will be happier in the long run.

 I do have to admit that the pinching back I had to do yesterday was quite dramatic and painful. Everything I loved about this plant was now going into the compost pile. And my pots, well, they're pretty pathetic. If you can't stomach the thought of doing this drastic of a beheading after spending your hard-earned money, try pinching back just half of the blooms, or leave just the buds. You'll notice I managed to save one little bloom and a couple of buds since they were growing low on the plants. Even this selective pruning will reward you with better blooming later. And you can always pinch off leggy stems later as the rest of the plant catches up and starts blooming.
If you want full, constantly blooming plants it really does pay to either buy plants before they start to bloom or pinch them back at planting. Granted, containers don't look great now, but they will look good in a couple of weeks and more importantly, they are going to look fantastic in a month and beyond. Pictures will be forthcoming!
The conundrum of plant buying is if the plant isn't blooming chances are you will overlook it. Buying plants can be such a visceral, emotional thing. A blooming plant is more likely to entice you to buy. However, this is not really the plant you want to plant. The best plant is short and wide, no flowers and preferably few buds. Sounds depressing, right? Basically, you want plants that have put their energy into roots and not flowers early in the season. Then when you plant them, they are well established and will bloom more than if you buy the flowering plant.
However, in order to get you to buy the plant, retailers will try to make sure that plant is blooming when you come to buy. Makes sense, right? That's where the pinching comes it. You can basically force a plant to put down roots at transplant time rather than continue spending it's energy putting out those lovely flowers that made you buy it in the first place.
 Case in point, I got these Red Morn petunias at work. Now our early warm weather in April made many of our plants go a little crazy, consequently, these are pretty leggy petunias. If I were to leave these as they are and plant them, the result would be disappointing. The plant would never fill out the pot I'm planting them in and the blooms will be sparse on spindly, scraggly stems. So not the look I'm going for.
By pinching off the long stems and yes, all the blooms, the plant will put it's energy into putting down a strong root system and sending out more stems on which to grow even more blooms. It's hard. I'm not even going to pretend that it isn't. It's taken me years to get on board this train and it still pains me to do it. The only way I can is that I know I will be happier in the long run.

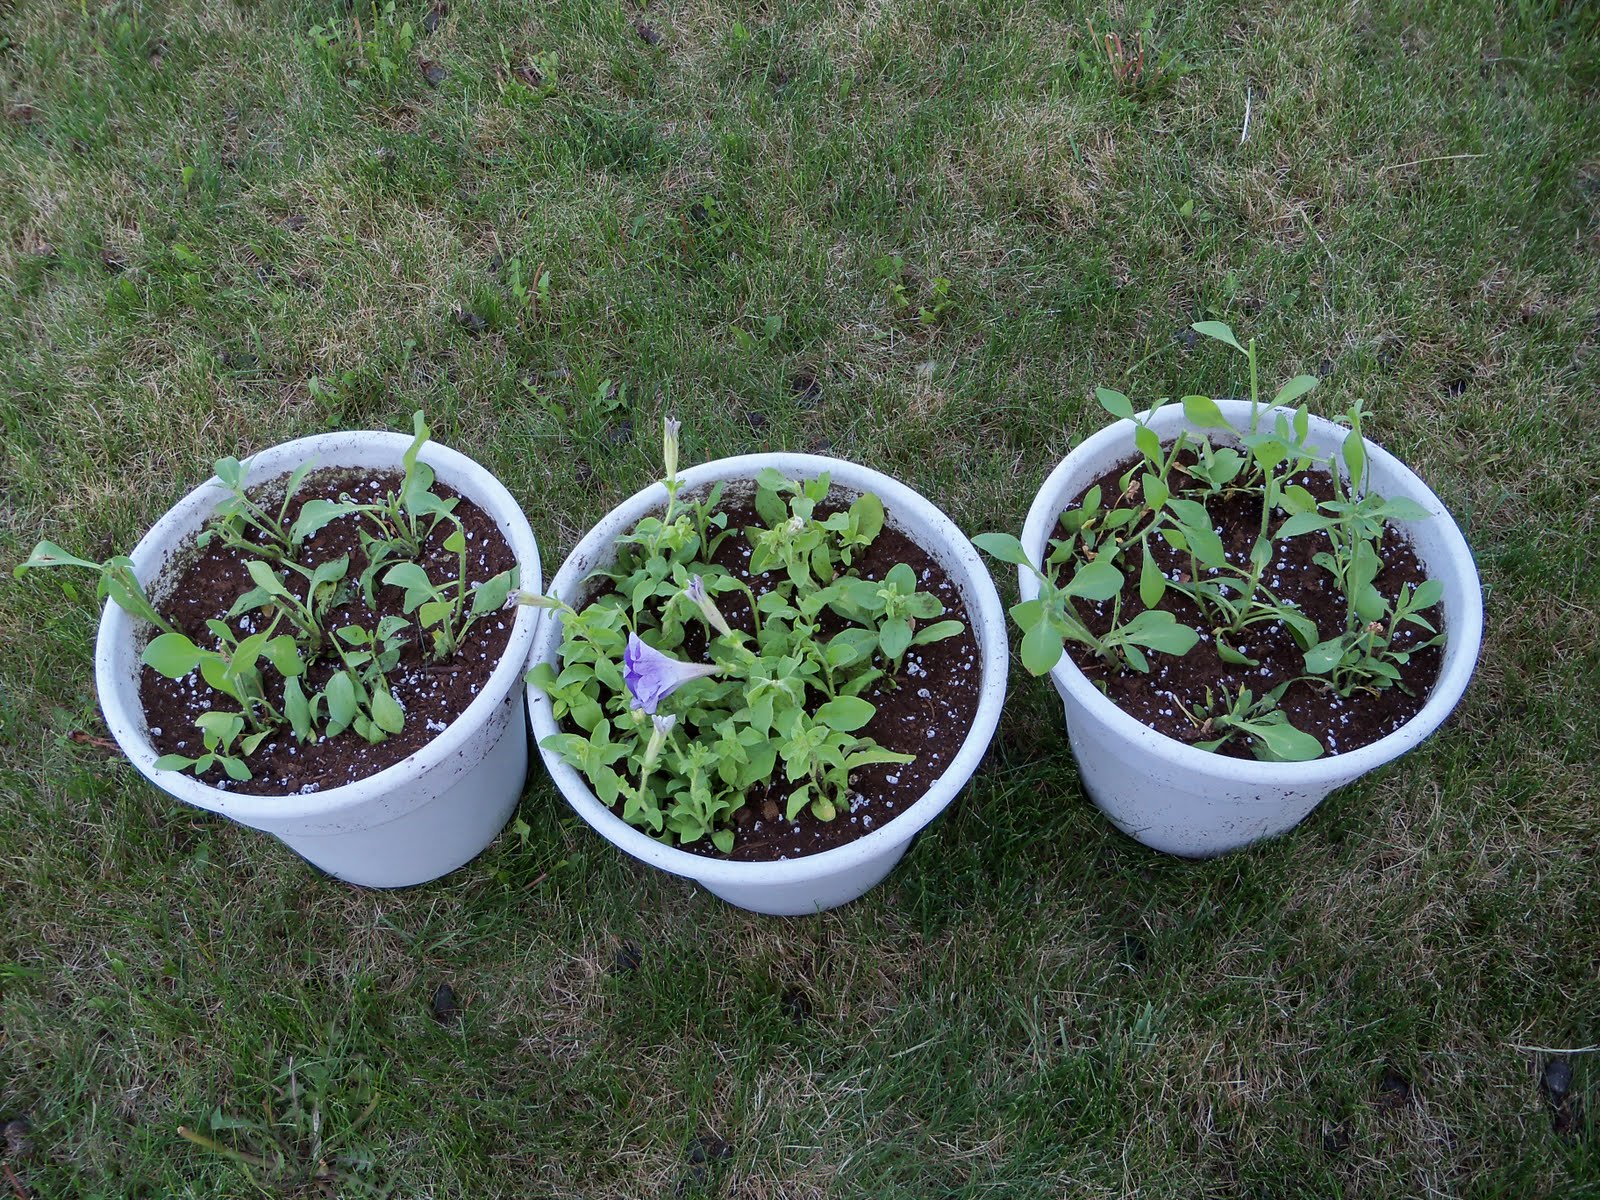 I do have to admit that the pinching back I had to do yesterday was quite dramatic and painful. Everything I loved about this plant was now going into the compost pile. And my pots, well, they're pretty pathetic. If you can't stomach the thought of doing this drastic of a beheading after spending your hard-earned money, try pinching back just half of the blooms, or leave just the buds. You'll notice I managed to save one little bloom and a couple of buds since they were growing low on the plants. Even this selective pruning will reward you with better blooming later. And you can always pinch off leggy stems later as the rest of the plant catches up and starts blooming.
If you want full, constantly blooming plants it really does pay to either buy plants before they start to bloom or pinch them back at planting. Granted, containers don't look great now, but they will look good in a couple of weeks and more importantly, they are going to look fantastic in a month and beyond. Pictures will be forthcoming!
Wednesday, November 4, 2009
Using Accessories in Container Gardens
Container gardens don’t need to be limited to being just a pot with flowers in it. You can use the same accessories in containers that you use in a traditional garden. These include trellises, tuteurs or obelisks, stakes and art. Use these sort of accessories to add height, interest, texture or color to your container garden.
Tuteurs and obelisks are essentially a 3-D trellis. They can be round, square or pyramidal and made from wood, bamboo or more decorative metal pieces. Many have finials or other decorative embellishments at the top which adds another element of interest to a container. The advantage to tuteurs and obelisks is that plants can either grow on the outside of the structure or grow from the inside. Whether to grow from the outside or inside will depend on the plant you are using and the look you are going for.
The most important thing when using accessories in container gardens is proportion. The container and the accessory need to be of corresponding size. Obviously, large trellises aren’t going to fit in small containers but neither should you put too small a trellis in a large container.
Also consider the weight of the structure you are using with the container. Using a heavy metal tuteur in a plastic container is not going to hold up to wind. Generally speaking, metal structures will do better in metal, concrete or ceramic containers. They have enough weight to counterbalance the structure. Wood or bamboo structures can go in lighter weight containers such as plastic or fiber mache.
Using these structures will enable you to use plants such as sweet pea, morning glory, cypress vine and black-eyed Susan vine in your container garden designs. In using tuteurs and obelisks you can get plants that traditionally grow down such as sweet potato vine to grow up with very little effort.
You can also use decorative stakes or smaller pieces of art to add whimsy and interest to your container flower gardens. Don’t limit yourself by your garden’s size. If it works in a traditional garden, you can make it work in a container garden as well.
Labels:
accessories,
containers,
design,
how-to,
tips


Saturday, October 11, 2008
What Goes Where? How to Design a Container Garden
The hardest part of gardening is deciding what plants to use. What plants go together? What about color? With the vast array of choices, where do you begin? The whole process can be overwhelming.
As I’ve mentioned previously, the basic container design is Up, Out, Down. Another way to look at it is "thrillers" or the focal plant, "fillers", mounding or spreading plants and "spillers", trailing plants. Varying the heights, growing habits, color and leaf shape of the plants used is what gives the container interest and makes a successful planting. Of course, there are containers that work well with a single plant and can be stunning but when you do combinations you don’t want the plants competing with each other. For example, if all the plants are upright, the container will look empty at the soil level. Using all trailing or spreading plants will look flat. Mounding plants do work well in a pot but can be boring unless in a grouping.
Good choices for the thriller or focal plant are taller, upright plants such as coleus, grasses, and taller varieties of petunias, snapdragons, zinnias and marigolds. Fillers include alyssum, trailing verbena, some trailing petunias, oxalis and smaller varieties of petunias, snapdragons and marigolds. Good trailers are vinca vine, creeping jenny, calibrochoa, bacopa and sweet potato vine.
So where do you start? I always start with a plant I love, something that catches my eye or that I just have to have. This can be any sort of plant. Sometimes I start with the focal plant, sometimes with the filler. It doesn’t really matter but having a jumping off point, a plant or color you want to have, makes choosing companion plants a whole lot easier.
One of the plants I love is the Global Merlot ivy geranium. I’m not sure if it’s the color of the blooms or the name that I love more but when I saw it, I knew I had to have it. So what to put with it? An ivy geranium is what I call a spreader. Some will call it a trailing plant but its growth habit is more straight out, filling in the soil line nicely. In this case, I started with the filler so I now I needed a focal point and a trailer. I literally walked around the greenhouse, carrying my plant and holding it up to others to see how it looked. It’s not unlike putting an outfit together. I found a sun coleus with burgundy and lime green leaves. The burgundy played nicely off the deep red blooms of the geranium and the lime green edging led me to the Marguerite sweet potato vine. One plant leads to another. There is contrast in growth habit and leaf shape but everything ties together.
It may take time to find plants that work together. What seems like a good idea in the greenhouse may not look so great when it all gets growing but that’s part of the process and what I think is part of the fun of gardening. Starting with a plant that you love and a basic formula does make the process a lot easier and increases the chances of creating a successful container.
Monday, May 19, 2008
Playing in the Dirt: Choosing Soil for Container Gardens
Soil is the most important component in gardening and it is even more so in container gardening. In my opinion, the whole point of container gardening is great results, huge plants and constant blooming. The best way to achieve this is to use the best soil possible. Soil can make or break a container. In some instances, rich soil will be a detriment (i.e. morning glory, moonflower and other vines in the ipomoea family) but for the most part, good soil is a must.
I don’t really recommend filling your pots with soil from the garden for several reasons. One, you don’t really know what the content of that soil is and just how well your plants might do. And again, the whole point of container gardening is good results. Second, the soil tends to be heavier (particularly here) and less rich. Perennials may do well but for short term growth? Not so much. In order to get this soil up to snuff you would have to add things like peat, perlite, and fertilizer and you still won’t be able to predict results. There’s also the possibility of having a high salt content, high or low ph or toxins in the soil that will affect plant growth.
I really recommend using potting soil that you either buy of make yourself. In our region Minnesota, peat based potting mixes work best with our water conditions. I have used Miracle Gro soil (which is a bark based soil) with satisfactory results so I can’t discount that entirely. Whichever you choose, I do recommend a potting mix with time release fertilizer mixed in the soil. If you can get a mix with the water saving crystals, I say get it. There have been some studies that say these crystals don’t significantly reduce watering. And I would say that likely true but I think what it does do is reduce stress on your plants in the hotter weather. You will still have to water everyday but the plants won’t dry out as bad between waterings. If it buys you a couple of hours until you get home from work and your plants aren’t stressed and wilting, I think it’s totally worth it.
If you have a lot of large pots or the cost of the premixed potting soil is cost prohibitive you can mix up your own soil. Buy the very basic potting soil for a couple of dollars per 20 pounds. In this area it’s sold under the name Hyponex. It does come with perlite added so you won’t have to add that, but you will have to add peat. Peat is fairly cheap and one of the best things you can do for any soil. As is the way I do things, I don’t have an exact ratio of soil to peat. I would do about half and half or at least enough peat to give the soil a more brown color and a lighter texture. Also, you will need to add Osmocote, a time release fertilizer. Follow the directions on the package. Mix up all the ingredients in a wheelbarrow or other large container. You can also add the water crystals if you desire.
I also recommend using new soil in your containers each year. The soil will be largely depleted after a season of use and the effort to get it back up to snuff, in my opinion, just isn’t worth it. In very large pots, I don’t dump all the dirt but probably about the top third or at least what it compacted with old roots. I dump all the old dirt in my garden. I figure if it has any magic left in it, it can help my perennials.
Choosing the right soil will vastly improve your container results. It’s the foundations of gardening. Get this part right and everything else is practically effortless.
Wednesday, April 16, 2008
Gone to Pots: Choosing Containers for Planting
Pots are largely a matter of personal preference although there are some practical things to consider when choosing containers such as size, weight and durability as well as style and color.
One thing all planting containers must have is good drainage. This cannot be emphasized enough. Good drainage typically means there is a least one good sized hole in the bottom of the pot so excess water can drain away from the roots. Without this the plants can drown. Yes, plants can drown. The roots of plants need oxygen and if they are waterlogged they will drown. The exception, of course, is water or marsh plants but that is another matter entirely. For container gardening, the plants need good drainage.
Most pots will have drainage holes in them and are ready to go as soon as you purchase them. However, sometimes they will not. This seems to happen to me when the container is really cool and I have to have it. Sure enough, no drainage holes. Fortunately, this is simple to remedy. Use a power drill and one of the larger bits in a basic drill set (1/4” to maybe 1/2”). Drill 2 to 3 holes in the bottom depending on the size of the pot and the size of the drill bit you are using. Very small pots (6” and under) will only need one. I have drilled metal, plastic and some kind of lightweight composite stuff, all with ease and great success. I have not drilled any kind of pottery, however, and suspect that may lead to a broken pot. I don’t know that I would risk that.
After determining that a pot has adequate drainage, the next things to consider are what you’re going to put in the pot and where you’re going to put it. Again, this can be completely subjective so I’ll go through some of the different materials pots are made of and the pros and cons of each.
Terra Cotta
Terra Cotta is the traditional orange clay pot that is practically synonymous with container gardening. I admit there is a certain charm to this type of pot but I choose not to work with them for a couple of reasons. Aside from the fact that they are breakable and I am clumsy, these pots MUST be soaked in a tub of water prior to planting or you will be a watering fool all summer long just trying to keep up with the watering. Terra Cotta is porous and will steal water from your plants if not initially waterlogged. Also, with the high salt content in the water we have here the pot gets what I consider to be an unsightly look. The pot will have a white crust on the outside as the salt in the water leaches out. Again, this is just my opinion. Some people like this rustic look—so this can be a pro or a con depending on the look you are going for. These containers tend to be on the heavy side so are better suited for windy areas and for containers you don’t intend on moving very often.
Plastic
Plastic pots are inexpensive for the most part and fairly durable. They will get brittle and tend to crack after a few seasons but for the most part can handle some rough handling and a few drops in their prime. One drawback is they will fade in the sun so any color other that white, light gray or tan isn’t going to look so hot after a few years either. However, they come in a vast variety of sizes and colors and are lightweight. Even if you are dealing with a large pot, it can still be portable if necessary (depending on your soil, of course, more on that later). Plastic containers now also come in many attractive finishes that look like stone or terra cotta without the expense or weight. Also, they pots hold water better than terra cotta thusly making watering slightly easier. I prefer plastic for all these reasons and generally choose either plain terra cotta colored ones or grey toned pots. Simple pots let the flowers shine and don’t detract from their beauty.
Metal
The metal pots I’ve gotten never seem to have drainage so I end up having to drill my own holes. Like plastic, metals come in a variety of finishes including some that mimic stone or slate without the weight of those materials. These containers tend to more expensive than either terra cotta or plastic but also tend to be more durable. I have several powder coated metal pots that I leave outside year round. Even with the harsh Minnesota elements, they hold up well. My metal containers are larger ones so not easily moved. It’s nice to be able to leave them outside and not have to worry they will get destroyed. If you’re looking for something highly durable but lightweight, metal is the way to go.
Other Materials
This year I’ve seen many pots made from bamboo—again the ones I saw had no drainage so you’d have to drill your own holes. Bamboo is very durable and lightweight, not to mention a sustainable resource. I haven’t had a chance to use these containers myself but I think they would make a good choice.
There are also peat pots, foam product pots and peat lined baskets. None of these is very durable and with the exception of the foam product containers, don’t hold water well. These can be a good choice for temporary plantings or shady areas. None of these will stand up to wind well either.
Painted clay pots have pretty much the same advantages as terra cotta without the disadvantage of the watering issue. The paint seals the container so water won’t leach out. Disadvantages with these types of containers will be cost, weight and durability.
Other considerations when choosing a container are size, color and design. You want the pots to be in scale to the area you plan to put them. That is, not so large and overpowering that it crowds the space nor so small that it gets lost in the space. Several smaller pots grouped together can work well in lieu of one big pot. I do recommend varying the sizes and heights of pots in a grouping.
What you plan to put in the container will also influence the pot you choose. If you are doing a more complex design with more than two types of plants, I suggest using a plain pot of neutral color. This is not to say that more ornate or colorful pots don’t have a place in the garden. They certainly do and can add great dimension and interest. In this case, just make sure that the pot is the statement and the flowers complement the container. In this instance one or two different plants at most is the way to go.
Whatever container you choose is really the right container for you. Just make sure it has good drainage and fits well in the space you plan to use. It’s really as simple as that!
Labels:
containers,
how-to,
tips
Thursday, March 6, 2008
Real Gardeners Don’t Plant in Pots...Do They?
When I first started gardening I considered pots to be the domain of the non-gardener. What came to mind were lone pots of geraniums placed on steps outside of otherwise barren landscapes. It was the least amount of effort and a small attempt to brighten up the summer that generally failed miserably. Real gardeners didn’t bother with pots I thought. They planted things in the ground and worked their magic to make them grow. That was the true mark of a “real” gardener. I now know that real gardeners are smart and plant in pots, too.
I spent years planting annuals in the heavy clay soil that is typical of my region. I would till peat into the soil, add slow release fertilizer, mulch and water, water, water. Sometimes I would get great results but more often than not, I was disappointed. My plants didn’t get big enough, they didn’t bloom enough, or quite simply, they died.
My first foray into container gardening was an unusual one. I had a bed on the north side of the house that was almost complete shade and tended toward the damp side. I planted it with impatiens, pansies and tuberous begonias. The impatiens and the pansies did great. The begonias, not so much. The soggy conditions the impatiens and pansies thrived in gave my begonias stem rot. The plants never flourished and consequently were overpowered by the very happy impatiens. I liked the way the design looked when the plants actually grew right so the next year, determined to get those begonias to grow, I bought two big plastic pots. I thought if the ground was too wet then I had to give them different ground. I buried the pots leaving only about 4 to 6 inches above ground level. I do have to admit that I filled the pots with the dirt I dug from around the pots. That was before I learned the importance of good soil. Still, I have to say the pots were a success. The soil in the pots remained dryer since it was separated from the rest of the bed which was subject to rain runoff from the house. The begonias thrived in the dryer conditions and because the level of the pot was higher than the ground, it gave height and dimension to what was otherwise a pretty but flat garden
It was then I realized just how versatile and productive container gardening can be. I now almost exclusively plant my annuals in containers for best results. I leave the heavy clay soil to the perennials which are better suited to those conditions.
There are many good reasons that container gardening is an attractive option. First and foremost, you can control soil conditions. Annuals grow much better, bigger and faster in good potting soil than they will in our clay soil. And when you have a short growing season like we do here in Minnesota, that’s important. Also on the short season note, you can start early! Generally here in the middle of Minnesota it’s not safe to plant annuals in the ground until Memorial Weekend, as a general rule. That’s pretty late in the season if you ask me as I start to get eager to play in the dirt around March. I do manage to hold off to the beginning of May for my pots though. If there is threat of frost as there often is here in May, I can just bring the pots in for the night.
Container gardening can be done in any amount of space so whether you live in an apartment or a house, you can have beautiful plants. Containers can be grouped together for a big effect or they can add height and interest to an otherwise flat bed. Pots can liven up dark spots and fill in dead spots where nothing else will grow. They are also portable so if something isn’t thriving in a particular spot it can be easily moved. And last, almost anything can be grown in a pot, including fruits and vegetables.
Container gardening adds a whole other dimension to traditional gardening and the two compliment each other nicely. In the coming weeks I’ll share some how-to’s of container gardening, different way to use containers in the overall gardening scheme, container designs and some of my favorite flowers for containers.
Subscribe to:
Posts (Atom)